I am going to step through a sample that i wrote that shows how easy it is to create a self hosted WCF service in c#. The sample code can be downloaded here and may be used freely.
Why do i want to host the service myself?
Self hosted services are faster than IIS hosted services as IIS adds a lot over head. It provides one with more options when it comes to the deployment of the services.
The solution structure.
The solution is divided into 4 projects. I am going to discuss the projects in a slight different order than what they appear.
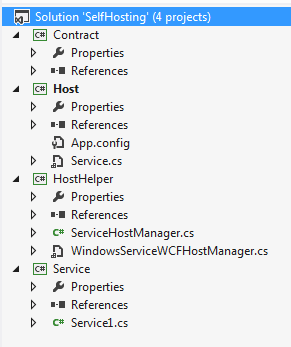
Contract – The contract project contains the data contract as well as the service contract for the service.
Service – This assembly contains the actual service implementation.
HostHelper – The host helper contains some helper code that makes it possible to host multiple wcf service in a single process. It also prints the description of the service out to the screen.
Host – The host project is responsible for creating the host environment. This host will be able to be used as a console application or as a installed Windows service.
The contract
Inside the Contract project you will find the service contract and the data contract within a single file. This file contains the default contracts created by Visual Studio when you create a WCF service library. Nothing special has been done to this code except that i have separated the contracts of the service from the implementation.
using System;
using System.Collections.Generic;
using System.Linq;
using System.Runtime.Serialization;
using System.ServiceModel;
using System.Text;
namespace Contract
{
// NOTE: You can use the “Rename” command on the “Refactor” menu to change the interface name “IService1” in both code and config file together.
[ServiceContract]
public interface IService1
{
[OperationContract]
string GetData(int value);
[OperationContract]
CompositeType GetDataUsingDataContract(CompositeType composite);
// TODO: Add your service operations here
}
// Use a data contract as illustrated in the sample below to add composite types to service operations.
// You can add XSD files into the project. After building the project, you can directly use the data types defined there, with the namespace “Service.ContractType”.
[DataContract]
public class CompositeType
{
bool boolValue = true;
string stringValue = “Hello “;
[DataMember]
public bool BoolValue
{
get { return boolValue; }
set { boolValue = value; }
}
[DataMember]
public string StringValue
{
get { return stringValue; }
set { stringValue = value; }
}
}
}
The Service
The Service.cs file is the default file created for you by Visual Studio when you create a WCF service library. All that has happened is that i have separated the contract from the implementation into separate projects.
namespace Service
{
// NOTE: You can use the “Rename” command on the “Refactor” menu to change the class name “Service1” in both code and config file together.
public class Service1 : IService1
{
public string GetData(int value)
{
return string.Format(“You entered: {0}”, value);
}
public CompositeType GetDataUsingDataContract(CompositeType composite)
{
if (composite == null)
{
throw new ArgumentNullException(“composite”);
}
if (composite.BoolValue)
{
composite.StringValue += “Suffix”;
}
return composite;
}
}
}
The Host Helper
The host helper project contains 2 files.
ServiceHostManager.cs
The ServiceHostManager is the more important of the two files. It allows the developer to easily host multiple WCF services in one host process and it prints important information to console about the services being hosted. This information is immensely useful when developing against the services.
WindowsServiceWCFHostManager.cs
The WindowsServiceWCFHostManager controls or manages the services. It provides the developer one location from where to register, open and close the services.
The Host
The host contains the code responsible for creating the environment within which the WCF service can be ran.
First thing to notice is that the host is inheriting from a class called WindowsServiceWCFHostManager. Next thing to notice is that there is an IF block in the Main method of the host. This “IF” block is responsible for deciding how the process will be ran.
If one launches the assembly by clicking on it the process will detect that it can launch as a user interactive process in which case it will be ran as console application. However if the process was launched as a windows service the process will not be user interactive capable at which point the host will be ran as a windows service.
namespace SelfHosting
{
class Host : WindowsServiceWCFHostManager
{
static void Main(string[] args)
{
if (Environment.UserInteractive)
{
Service service = new Service();
service.Start();
Console.WriteLine(“Press Enter to quit”);
Console.ReadLine();
service.Stop();
}
else
{
ServiceBase.Run(new Service());
}
}
The “magic” code that allows for easy hosting of multiple WCF services in a single process can be found in the “RegisterServiceHosts” method. Instances of the service hosts are simple created and added to the list. When the service.Start() method is called the base class iterates through the list and opens each host. The same happens when the services.Stop() method is called.
public override IEnumerable RegisterServiceHosts()
{
List hosts = new List();
hosts.Add(new ServiceHost(typeof(Service1)));
return hosts;
}
This allows multiple wcf services to be grouped together inside a single process and aids the ease of deployment.
The host also contains the app.config file which contains the configuration files required by the service. There are two thing to note. One is that because we are running as a self hosted process we have to dictate a port number and secondly because there is no .scv file used to activate the service the service location is virtual. You can also define any address you possibly wish in the BaseAddress element. It does not even need the svc extension.
<?xml version="1.0" encoding="utf-8" ?>
<configuration>
<system.serviceModel>
<services>
<service name="Service.Service1">
<host>
<baseAddresses>
<add baseAddress = "http://localhost:8733/Service1.svc" />
</baseAddresses>
</host>
<endpoint address="" binding="basicHttpBinding" contract="Contract.IService1"/>
<endpoint address="mex" binding="mexHttpBinding" contract="IMetadataExchange"/>
</service>
</services>
<behaviors>
<serviceBehaviors>
<behavior>
<serviceMetadata httpGetEnabled="True" httpsGetEnabled="True"/>
<serviceDebug includeExceptionDetailInFaults="True" />
</behavior>
</serviceBehaviors>
</behaviors>
</system.serviceModel>
</configuration>
Running the Sample
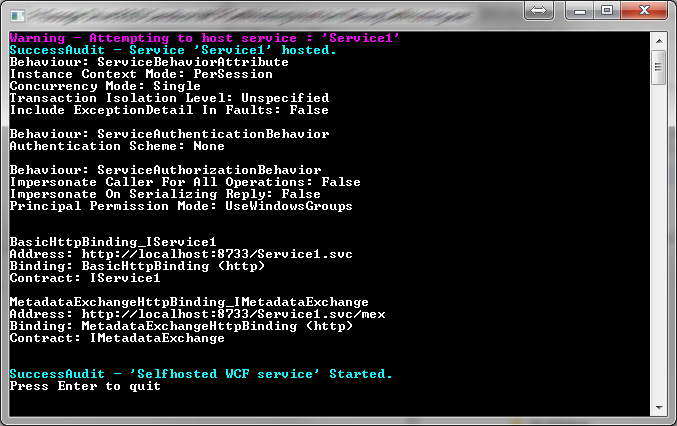
When the host.exe application is launched a window as shown below will be displayed. It shows the Services name and the configuration used by the service.
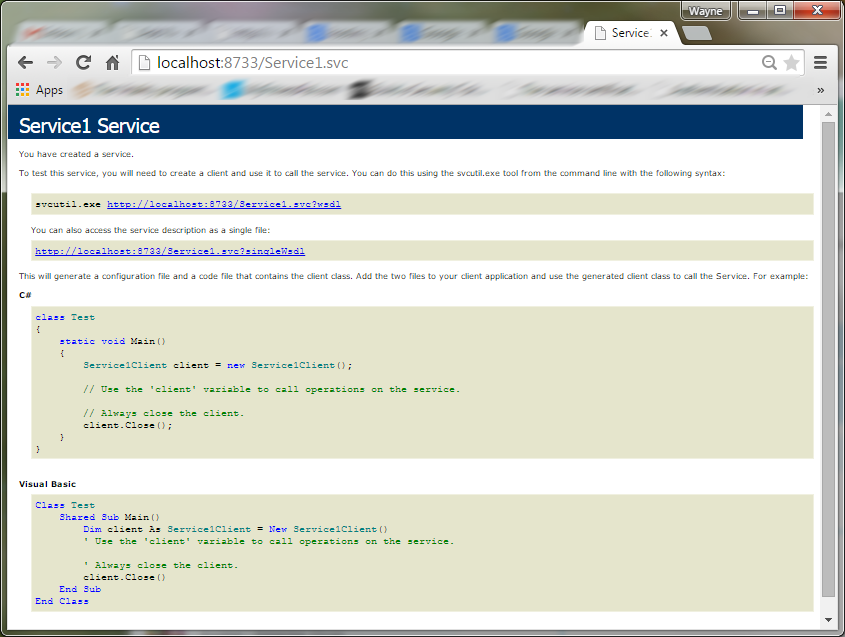
To access the self hosted service type the address displayed in the console application into a web browser. Note that one can only browse to the service if a http endpoint is being used..
Installing the self hosted service as a windows service.
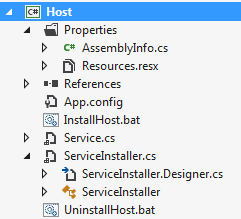 Inside the host project are 2 batch files. InstallHost and uninstallHost.
Running the InstallHost.bat file will install the self hosted WCF service as a windows service and obviously the uninstall will uninstall the service.
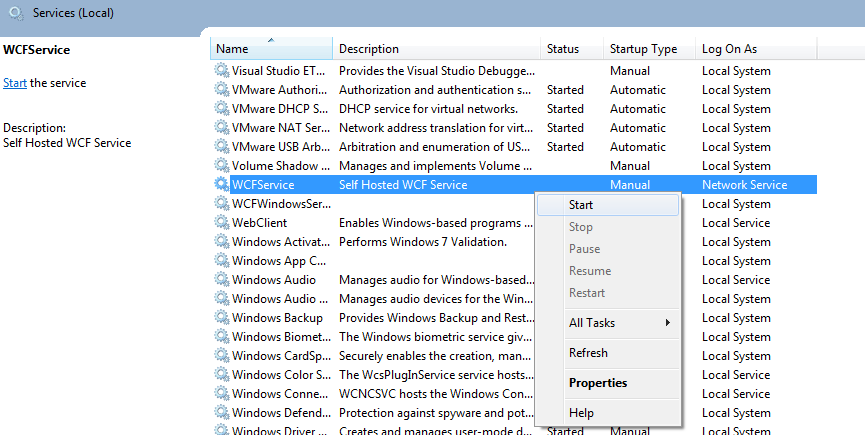
When the service has been installed it will appear as a windows service inside the Services console window (see below). From here the service can be stopped and started. The name and description displayed here can be adjusted inside the project resources file.
When the service is installed and running as a windows service it will no longer have a console window to which it can write instead it will write to the logs in the event viewer.

This concludes the sample.