The following example uses an active security token service (A-STS) that issues tokens using the WS-Trust standard. The type of STS discussed in this post is called a Active STS OR A-STS, it refers to the client that is actively in control of its own authenticated state. This client will typically have its own login window build into the application. It will not be sharing cookies with other application or be part of a federation. Click this link if you wish to see how to create your own passive STS or click this link if you wish to see how to integrate with a passive STS.
The sample I have provided makes use of WS-Trust.
Click here to download A-STS sample discussed below.
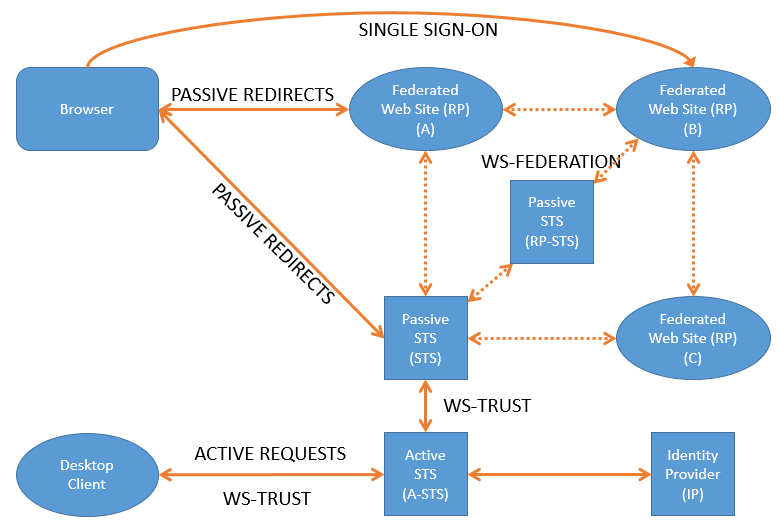
WS-Trust in its most basic definition allows for the building of trust between 2 parties. The trust is established through the use of certificates. The certificates with which the token is signed acts as proof of identity. Me, the client will trust and accept tokens issued by a specific Issuer. The clients provides the STS with credentials, usually a username and password and the STS (Issuer), retrieves informations about the identity and adds it to the token. The token is then signed with the STS certificate. The the client will know that it can trust the received token as it can identify and verify the certificate that the token was signed with. See the following post for more definitions about the WIF terms. The diagram below gives an overview to where a A-STS could possible be used.
The token provides a secure way to share information regarding the logged in user with trusted clients and only those clients that can decode the token can read the user information.
A Security Token Service (STS) is a software based identity provider responsible for issuing security tokens, especially software tokens, as part of a claims-based identity system. In a typical usage scenario, a client requests access to a secure software application, often called a relying party.
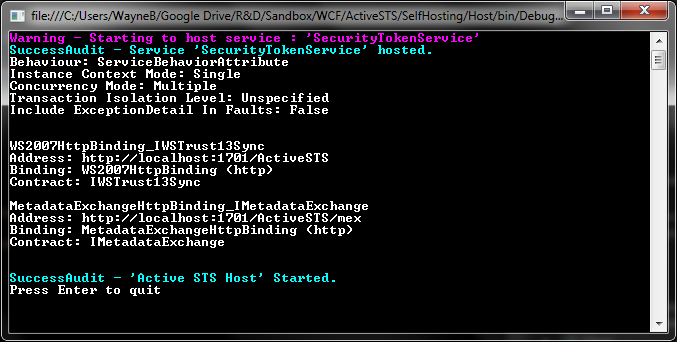
The sample hosts the STS within a self hosted console application but it is also possible to host it within IIS.
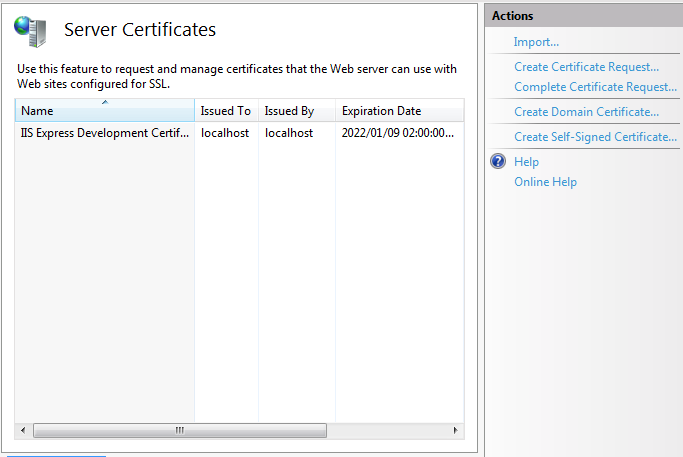
Note – in my sample a certificate with the subject “localhost” is required. I have disabled the verification of the certificate to allow the sample to work with a self signed certificate. A self signed ‘localhost” certificate can be generate through IIS. There is a known bug with multi domain and wild card certificates within WCF, read about it here.
Within the solution you will find the following projects.
ActiveSTS
The ActiveSTS project contains the code for the custom token service.
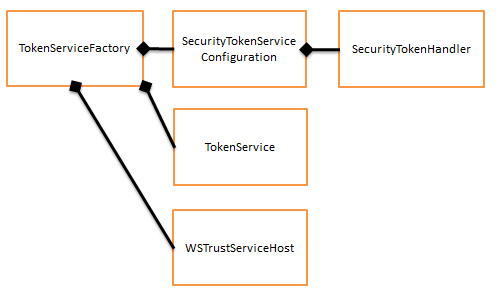 SecurityTokenHandler – The tokenhandler is responsible for authenticating the incoming request and creating the claims identity. The claims identity contains all the information of the user that was authenticated. Microsoft provides a list of predefined claim types that can be used but it is possible to define your own claim types.
This is where a developer will do his own authentication. It is possible to have several handlers to do different types of authentication, maybe you wish to authenticate using a active directory, email address or maybe with a OTP (One time password). Each one will need to have its own handler.
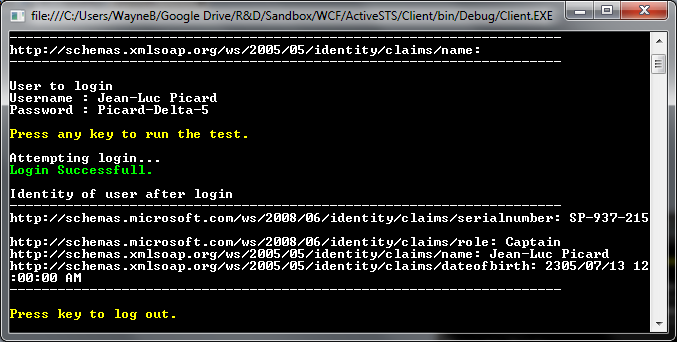
The token handler in this example does not validate the incoming username and password against a resource, instead i have just hard coded the expected username and password.
public class CustomAuthenticationHandler : UserNameSecurityTokenHandler
{
public override bool CanValidateToken
{
get
{
return true;
}
}
public override ReadOnlyCollection
{
UserNameSecurityToken userToken = token as UserNameSecurityToken;
if (token == null)
{
throw new ArgumentNullException(“token”);
}
if (userToken == null)
{
throw new SecurityTokenException(“Invalid token”);
}
return new ReadOnlyCollection
}
protected virtual ClaimsIdentity AuthenticateUser(string username, string password)
{
Console.ForegroundColor = ConsoleColor.White;
Console.WriteLine(“———————————————————————“);
Console.WriteLine(string.Format(“Attempting login for user {0}”, username));
// Validate the user cridentials at this point. Either against your own ldap directory or database.
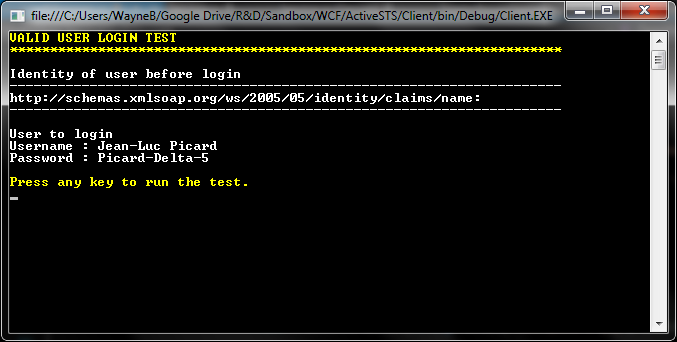
if (username == “Jean-Luc Picard” && password == “Picard-Delta-5”)
{
Console.ForegroundColor = ConsoleColor.Green;
Console.WriteLine(string.Format(“Login Successfull.”));
// Add claims for the authenticated user. This can be any information you wish the the bearer of the token to have access to regarding this identity.
List
claims.Add(new Claim(ClaimTypes.SerialNumber, “SP-937-215”));
claims.Add(new Claim(ClaimTypes.Role, “Captain”));
claims.Add(new Claim(ClaimTypes.Name, username));
claims.Add(new Claim(ClaimTypes.DateOfBirth, new DateTime(2305, 07, 13).ToString()));
var identity = new ClaimsIdentity(“CustomAuthentication”);
identity.AddClaims(claims);
return identity;
}
Console.ForegroundColor = ConsoleColor.Red;
Console.WriteLine(string.Format(“Login Failed”));
throw new System.ServiceModel.FaultException(“Unable to Authenticate user.”);
}
}
TokenService – Receives the claims identity from the token handler, signs and encrypts it and outputs it as a token.
public class TokenService : SecurityTokenService
{
public TokenService(SecurityTokenServiceConfiguration securityTokenServiceConfiguration)
: base(securityTokenServiceConfiguration)
{
}
public static X509Certificate2 GetCertificate(string subjectName)
{
var store = new X509Store(StoreName.My, StoreLocation.LocalMachine);
X509Certificate2Collection certificates = null;
store.Open(OpenFlags.ReadOnly);
try
{
certificates = store.Certificates;
var certs = certificates.OfType
if (certs.Count == 0)
throw new SecurityException(string.Format(“No certificate for subject {0}”, subjectName));
else if (certs.Count > 1)
throw new SecurityException(string.Format(“There are multiple certificates for {0}”, subjectName));
return new X509Certificate2(certs[0]);
}
finally
{
if (certificates != null)
{
for (var i = 0; i < certificates.Count; i++)
certificates[i].Reset();
}
store.Close();
}
}
protected override System.Security.Claims.ClaimsIdentity GetOutputClaimsIdentity(System.Security.Claims.ClaimsPrincipal principal, System.IdentityModel.Protocols.WSTrust.RequestSecurityToken request, Scope scope)
{
if (principal == null)
{
throw new ArgumentNullException("principal", "'principal' cannot be null.");
}
if (request == null)
{
throw new ArgumentNullException("request", "'request' cannot be null.");
}
if (scope == null)
{
throw new ArgumentNullException("scope", "'scope' cannot be null.");
}
// Retrieve the authenticated Identity
ClaimsIdentity authenticatedIdentity = principal.Identity as ClaimsIdentity;
if (authenticatedIdentity == null)
{
throw new ArgumentNullException("authenticatedIdentity", "'authenticatedIdentity' cannot be null.");
}
return authenticatedIdentity;
}
protected override Scope GetScope(System.Security.Claims.ClaimsPrincipal principal, System.IdentityModel.Protocols.WSTrust.RequestSecurityToken request)
{
// Need to validate request AppliesTo url against a list of known allowed Passive STS sites.
if (principal == null)
{
throw new ArgumentNullException("principal", "'principal' cannot be null.");
}
if (request == null)
{
throw new ArgumentNullException("request", "'request' cannot be null.");
}
var scope = new Scope(request.AppliesTo.Uri.OriginalString, SecurityTokenServiceConfiguration.SigningCredentials);
string certificateName = ConfigurationManager.AppSettings["CertificateSubject"];
var encryptingCertificate = GetCertificate(certificateName);
var encryptingCredentials = new X509EncryptingCredentials(encryptingCertificate);
scope.EncryptingCredentials = encryptingCredentials;
// Enable encryption (true by default)
scope.TokenEncryptionRequired = true;
scope.SymmetricKeyEncryptionRequired = true;
scope.ReplyToAddress = request.ReplyTo;
return scope;
}
}
[/code]
TokenServiceFactory – The Factory is responsible for creating the WSTrustServiceHost which contains the Security Token Service. The factory constructs the configuration to use with the STS. The configuration defines which handler should be used to do the authentication with.
public class TokenServiceFactory : ServiceHostFactory
{
private SecurityTokenServiceConfiguration GetActiveSTSConfiguration()
{
var signingCredentials = new X509SigningCredentials(TokenService.GetCertificate(ConfigurationManager.AppSettings["CertificateSubject"]));
var config = new SecurityTokenServiceConfiguration(ConfigurationManager.AppSettings["CertificateIssuer"], signingCredentials);
config.SecurityTokenHandlers.AddOrReplace(new CustomAuthenticationHandler());
config.SecurityTokenService = typeof(TokenService);
config.CertificateValidationMode = X509CertificateValidationMode.None;
return config;
}
public ServiceHost CreateServiceHost(string hosturl)
{
return CreateServiceHost(typeof(TokenService), new Uri[] { new Uri(hosturl) });
}
protected override ServiceHost CreateServiceHost(Type t, Uri[] baseAddresses)
{
SecurityTokenServiceConfiguration config = GetActiveSTSConfiguration();
WSTrustServiceHost host = new WSTrustServiceHost(config, baseAddresses);
return host;
}
}
ActiveSTSProxy
This project contains the code required for a client to connect to the custom STS and decode the token.
ActiveSTSProxy - Provides sign in and sign out methods. Internally the sign in method requests a token, de-crypts the token and creates a session token while also applying the identity to the thread identity.
TrustedIssuerNameRegistry - This class is used by the proxy to keep a list of STS's that it trust. Trust is confirmed by checking the cetificate with which the token was signed.
Client
The client is a console application that demonstrates the changes to the identity as a user signs in and out. The code to sign in and out to get a token is real simple.
SessionSecurityToken token = null;
Proxy.SignIn(userName, password, out token);
Host
The host creates the STS through the factory and host it on a address specified in the app.config file. The WS2007 binding being used runs on http and not https.
<ws2007HttpBinding>
<binding name="ws2007HttpBindingConfiguration">
<security mode="Message">
<message clientCredentialType="UserName" establishSecurityContext="false" negotiateServiceCredential="true" />
</security>
</binding>
</ws2007HttpBinding>
Something to note is the configuration of the binding within the host. The clientCredentialType attribute specifies the type of handler that will be used to authenticate a user. You will notice that the handler in this sample inherits from "UserNameSecurityTokenHandler"
List
hosts.Add(new TokenServiceFactory().CreateServiceHost(ConfigurationManager.AppSettings["ActiveSTSHttpAddress"]));
return hosts;
HostHelper
This project contains some helper classes used for hosting a service. It is discussed in more detail in the Self hosting post.
Reference: https://msdn.microsoft.com/en-us/library/ee804740.aspx
Hi,
Nice article! I have a question though.
do you have an example where your Active STS now should receive Token from another STS (e.g. ADFS) and should be able to generate token for the service. ADFS token is already obtained.
If not, how do you go about handling such scenario? Mainly the client code with using channel factory.
Hi ud
Are you integrating into the ADFS server? Cause then you need to look at this article. http://www.waynecliffordbarker.co.za/passive-sts-integration/
The A-STS is used mostly by desktop applications and back-end services only. A passive STS may contain a A-STS but it should not be exposed via the web as its for internal authentication mostly. A website should use a passive STS instead. Look at this article on how to write your own. http://www.waynecliffordbarker.co.za/create-your-own-passive-sts/
If you have a desktop application and can’t do the passive integration showed above ill try and guide you.
I am assuming that the ADFS server has issued a SAML1 token using WS-Federation. SAML protocol is different. For you to accepts the ADFS server token there will need to be trust between the two parties which means you will need to have the encryption and signing certificates from the ADFS server.
If you have that then you simply have to; 1) decode the token, 2) retrieve the claims from it, 3) transform the claims into to the format you require and 4) create the new Token from your active STS signed by your own certificates. That will allow your services to use it.
I do not have a sample showing all these steps but the article http://www.waynecliffordbarker.co.za/decoding-fedauth-xml/ will show how to decode and retrieve the claims.
Hi Sorry just realized what you where asking. You are wanting a custom authentication handler on the Active-STS to be able to accept tokens as the credential.
To be honest I have never had to do that. I do know that it involves using the SessionSecurityTokenHandler instead of the UserNameSecurityTokenHandler.
You will also have to change the message security on the binding from “UserName” to “Token”.
That is the extend on my knowledge about that.